This is the continuation part of “Sqoop Complete Tutorial”.
20) Importing all tables from MySQL to Hive
Importing a table from MySQL to Hive’s default database.
The below command will help in copying all the tables from MySQL to Hive user database.
sqoop import-all-tables
–connect jdbc:mysql://localhost/empdept
–username root –password cloudera
–hive-import
–hive-database dbTest
It successfully imported the data from “emp” and “dept” tables from MySQL’s “empdata” database to Hive.
However, if I look at the data, I see the records are duplicated. 
The reason for the duplication is the tables “emp” and “dept” already exists in the database. hive-overwrite will help in replacing the data if already exist.
sqoop import-all-tables
–connect jdbc:mysql://localhost/empdept
–username root –password cloudera
–hive-import –warehouse-dir /user/hive/warehouse/dbtest
–hive-database dbtest
–hive-overwrite
Here we have additionally provided the warehouse directory to specify the location of the database. After executing this script, the results are just fine. 
21) Importing all tables but excluding few from MySQL to Hive
I have created a table named “location” in my current database ’empdept’ as shown below.

I am about to import all tables but excluding ’emp’ and ‘dept’ since those were already imported. Since “location” is the only table to import, I can specify the table name, however, let’s see how it can be done with sqoop-import-all.
sqoop import-all-tables
–connect jdbc:mysql://localhost/empdept
–username root
–password cloudera
–hive-import
–hive-database dbtest
–exclude-tables “emp,dept” 

If you look at the above screenshots (click on the images to enlarge), the import process selecting only “loc” table and excluding the tables “emp” and “dept” from the import.
Well, the import process is completed and the table schema and data populated into Hive warehouse/database. Let’s verify in Hive. 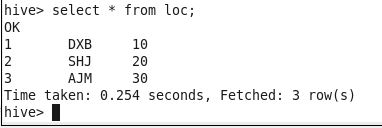
Please click here for the next part.
