Is your SQL database marked as suspect?
Learn how to bring the Database online from the Suspect Mode in SQL server with manual as well with the help of an automated solution.
Microsoft SQL Server is a database creation and manipulation application. It is a relational database management system that stores and retrieves data based on user requests.
Structured Query Language is the programming language used to manage this database server. SQL is used to create large databases with tabular data storage. The SQL Server frequently generates multiple errors and bugs.
One such issue is that the database enters Suspect Mode. This is a difficult problem that cannot be solved manually. Whether it’s because it got there on its own or you triggered it deliberately for maintenance reasons, sooner or later, you will be faced with this situation.

In this article, we will cover how to bring your database from the suspect mode in the SQL server by going through different ways to go from suspect mode to online. Read on to know more about the process to recover SQL database from suspect mode with complete manual and automated methods.
What’s Database Suspect Mode in SQL Server?
Because the SQL database operates in various modes such as Online, Offline, Restoring, Recovering, Recovery pending, Suspect, and Emergency, there is always one specific situation in the SQL database at any given time. However, each mode describes the current state of the database files and necessitates separate procedures to handle them. Consider the ‘SQL Server Database Suspect mode scenario.
When connecting to a SQL Server database, if you see a message indicating that the database is in suspect mode, it means the server suspects that the database’s primary filegroup has become inaccessible. In such a case, you will be unable to connect to the database and will be unable to recover it during server startup.
Causes of Database to Enter the Suspect Mode in SQL Server
A suspect database indicates that the database recovery process has begun but has not yet been completed successfully. This instructs users to resolve the problem and repair the corrupted files.
Users cannot connect to suspect databases to read or write data while they are in suspect mode.
A database can enter the suspect mode for a variety of reasons. Among them are the following:
- SQL Server Failure
- Database files are no longer accessible.
- Failures in SQL Server Database Operations
- Because of an Unexpected Power Outage
- Incorrect database or database server shutdown.
- Failure of hardware.
- Database file corruption.
- The SQL Server does not have enough space to recover the database during startup.
- Inaccessible database files or a lack of memory
- During any maintenance work, database files’ drive letters are mistyped or changed.
These are some of the possible causes of the occurrence of suspect mode in your SQL file. So, now we’ll go over the various procedures for removing a database from the suspect mode in SQL server.
How to Recover Database from Suspect Mode in SQL Server?
Users can use two methods to recover a suspect database and reclaim their files. The foremost method is the manual method. It is a free DIY approach that takes time to produce results. The second method, on the other hand, is just a quick and automated technique for solving SQL database suspect queries.
Manual Method to Recover the Suspect Mode in SQL Server
Step 1: Run the Command
Test whether the Alter Database command with Set Online brings the database online:
ALTER DATABASE yourdb_name SET ONLINE WITH ROLLBACK IMMEDIATE;
Step 2: Using the Most Recent Backup, restore the database.
If you have a current backup, restore the database from it. However, depending on the size of the database, restoring from backup may take some time. Also, if you don’t have a backup or it’s out of date, move on to the next solution.
Step 3: Set the database status to ‘EMERGENCY’ and then run Repair.
Follow these steps to repair the suspect database:
- Before you repair the database, you must remove the suspect flag. In order to run the repair operation, the database must also be accessible. To accomplish this, run the T-SQL query below to set your database status to EMERGENCY.
ALTER DATABASE yourdb_name SET EMERGENCY;
- Run the DBCC CHECKDB command after the database has been set to EMERGENCY mode. The command will return some errors and recommend the simplest repair option (REPAIR REBUILD or REPAIR ALLOW DATA LOSS) to run in order to repair the database.
DBCC CHECKDB yourdb_name WITH no_infomsgs;
- Using WITH NO INFOMSGS in the DBCC CHECKDB command will remove any unnecessary messages and only display the errors.
- You must have exclusive access to the database before running the repair option, which requires setting the database to SINGLE USER mode.
ALTER DATABASE yourdb_name SET SINGLE_USER WITH ROLLBACK IMMEDIATE;
- Then, using the recommended repair option, run DBCC CHECKDB. Set the database to MULTI USER mode after completing the repair process.
DBCC CHECKDB yourdb_name REPAIR_ALLOW_DATA_LOSS;
- Finally, return the database to MULTI_USER mode:
ALTER DATABASE yourdb_name SET MULTI_USER;
What to do if the Manual Method does not work?
The above-mentioned solution appears simple, but it does not always work in the case of a severely corrupt database. In that case, you should consider using professional SQL Database Recovery software. The software is capable of recovering MS SQL databases from Suspect Mode. It is easy to use, flexible and efficient. It basically saves the database into SQL Server MDF files. You can then easily recover your database.
This application is extremely capable and simple to use. This software can repair all MDF file objects such as tables, views, constraints, indexes, functions, triggers, procedures, and data types. This tool allows you to take a snapshot of the database recovery and save it in a variety of user-defined locations. As a result, it saves time and reduces effort.
Automatic Method to Recover the Suspect Mode in SQL Server
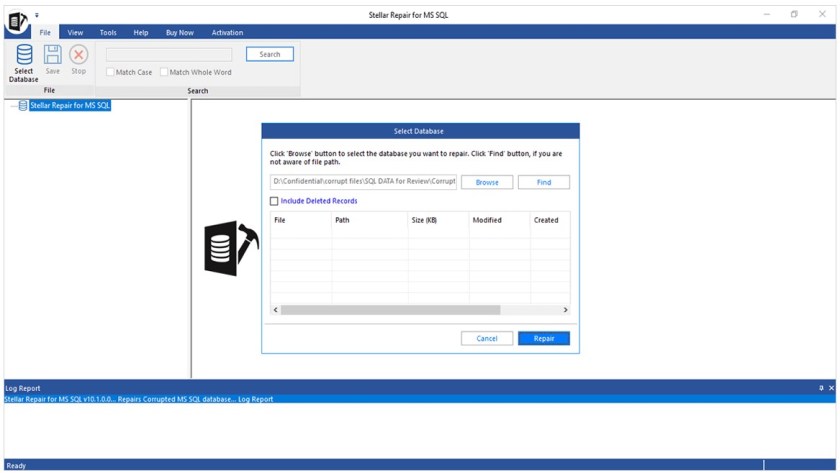
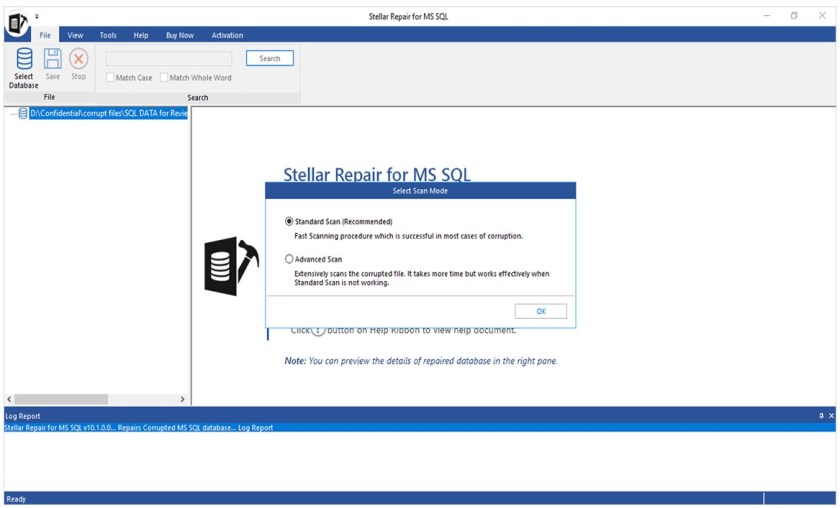
The Stellar Repair for MSSQL tool is the most dependable way to transition from suspect to normal mode. This tool is a professional solution for recovering SQL files from corrupt MDF and NDF files. Based on the level of corruption, the software provides two recovery modes: standard mode and advanced mode. It has an extremely user-friendly interface and is compatible with all editions of Windows servers and SQL servers. The app also includes a free demo version and a technical support team for its users. If you want to recover an MS SQL database from a suspect state using this smart utility, follow the basic steps outlined below.
- Install and Run after you download the Stellar Repair for MS SQL software.
- Choose Browse or Search from the Select Database window to locate the suspect database’s SQL database file (.mdf).

- Once the file has been selected, click Repair.
- Now Select the Scan Mode from Standard scan or Advanced Scan option
- After the completion of MDF file repair process, Click on OK

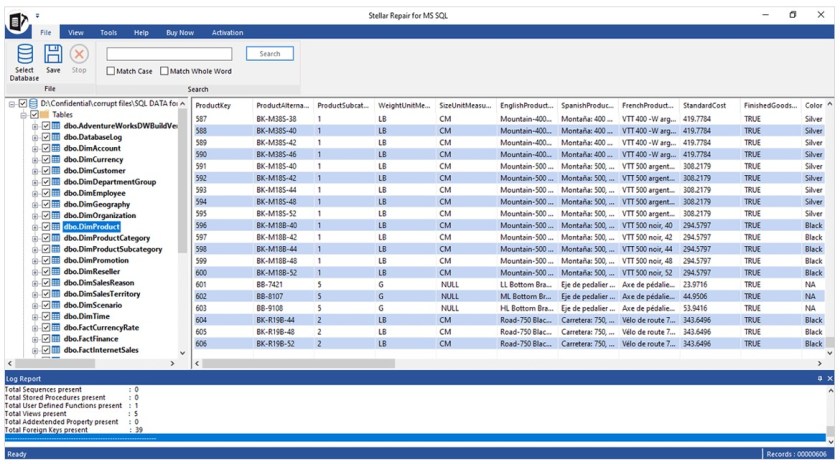
- Now Preview the SQL Database objects such as Tables, Functions, Stored Procedure, Views etc.
- The user can select an option to save the repaired SQL database file. Click Next to proceed.
Conclusion
Hope you understood how to bring the database online from the suspect mode in the SQL server. In most cases, users will repair the Suspect database and re-access it using the steps outlined above. However, sometimes the solution is unable to recover the SQL database from Suspect Mode to Normal, which happens when the SQL server device files are severely corrupted.
If you find yourself in this situation, don’t be afraid to use Stellar Repair to repair your database and recover lost records. The software aids in the repair of SQL database files, allowing users to regain access to their databases.

One comment